[AWS] Guide to Configuring a Bastion Host
Guided practice to setup Bastion host and test connectivity
A fledgling engineer dabbling into areas of DevOps, AWS and automation. I enjoy tinkering with technology frameworks and tools to understand and gain visibility in the underlying mechanisms of the "magic" in them.
In the progress of accumulating nuggets of wisdom in the different software engineering disciplines!
Overview
Disclaimer on operating system
- I am using a MacOS device.
- You may need to find equivalent commands/tools should you be using a different OS device.
This article will cover the following areas:
AWS VPC and Subnets on a high level
Walkthrough the Bastion host setup
Verifying that the Bastion host setup is working
Glossary
CIDR - Classless Internet Domain Routing, an IP addressing scheme that uses IP network prefix/CIDR notation, i.e. the IP address ending with a slash followed by a number. Can use the CIDR notation to compute the available number of IP addresses as well.
VPC - Virtual Private Cloud, the virtual network that is defined by you and tied to your AWS account.
Subnet - A sub-division of your VPC. It can be a public subnet (accessible via the Internet) or a private subnet (with limited access, only hosts in the same subnet can talk to each other).
Key points on VPC and Subnets
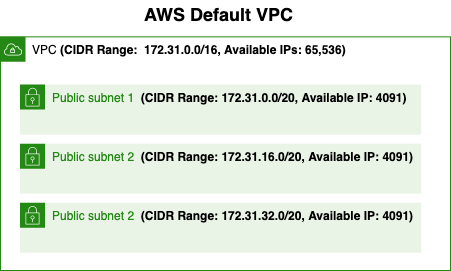
When you first create an AWS account, a default VPC with CIDR range of
172.31.0.0/16is assigned to you. The default subnets created within the VPC are assigned/20netblocks within the VPC's CIDR range (a.k.a primary CIDR block).The valid CIDR IP ranges are between
/16to/28.You are able to create up to 4 secondary CIDR blocks (i.e. 4 different subnets) within the VPC's CIDR range.
Note that 5 IP addresses in each subnet will be reserved by AWS for the following purposes
Routing
Domain Name System (DNS)
Network Management
The public subnet's Route Table would have the Internet Gateway attached to it to allow communication between the Internet and your VPC. Whereas the private subnet would have the destination to the primary CIDR block, and its target would be
locali.e. being able to communicate with hosts within the VPC.The default subnets in the default VPCs are public subnets.
Overview of Bastion Host
What is a Bastion host
Bastion host is an instance, typically located in the public subnet to provide access resources inside the private subnet. It is also commonly known as the jump host.
High-level best practices
Some best practices to note:
Use SSH agent forwarding in the implementation of Bastion hosts, instead of storing the private key in the Bastion Host
The Bastion host should only include what is essential, so packages and installations should be removed if not needed and kept to the minimum.
Setup Walkthrough
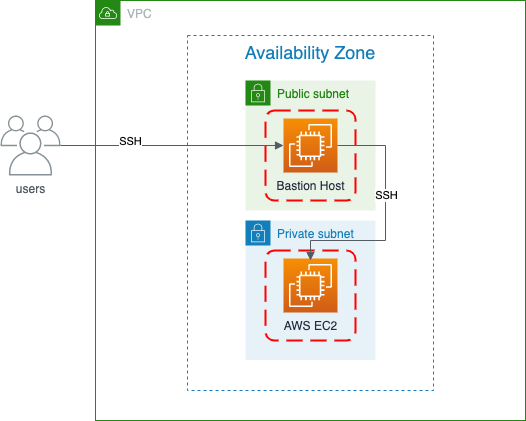
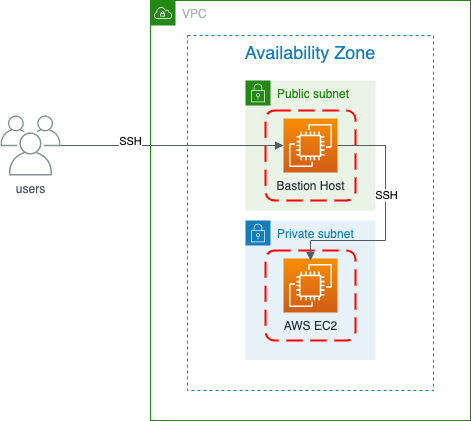
Now that we have covered the key points for the VPC and subnets, we will jump straight into the setup of the Bastion host. Below is a diagram to illustrate what we intend to setup
AWS Services to Use
Below is the list of AWS services that will be used in this setup
Network components: VPC, Subnet, Internet Gateway, and Route Table
EC2 components: SSH Key Pair, Security Groups + EC2 (Linux)
Setting up the network
While we will be using the default VPC for this setup, there are still some additional configurations required for the private subnet and its route tables.
Creation of new subnet and route table will not incur additional cost.
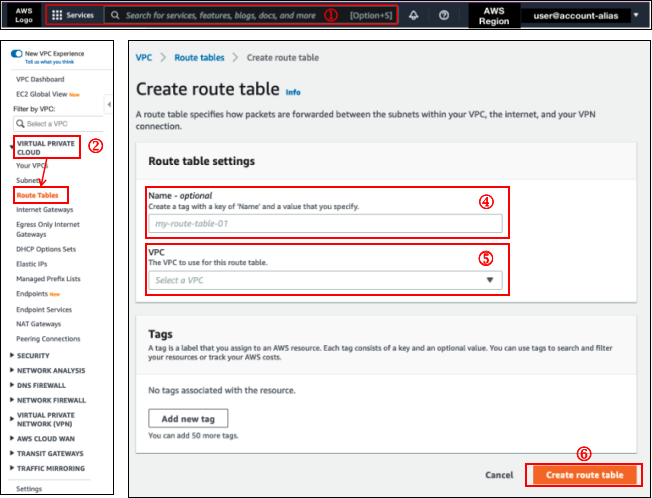
1. Create a route table for the private subnet
You will need to first create a route table for the private subnet as the default VPC does not have a route table for it.
To create a route table,
Search for
VPCto navigate to the VPC Dashboard.Click
Route Tableson the left navigational side panelClick the
Create route tablebuttonEnter the name of the new route table
Select the VPC to use for the new route table
Click
Create route table
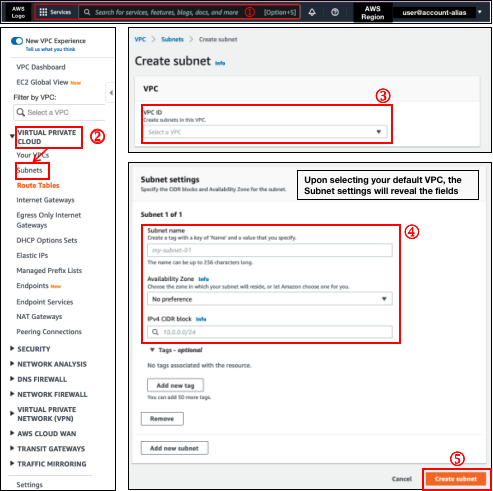
2. Create private subnet and assign route table
An additional private subnet will be added as all default subnets are public subnets.
To create the subnet,
Search for
VPCto navigate to the VPC Dashboard.Click
Subnetson the left navigational side panelClick on the
Create subnetbutton. (Not included in image below)Select the target VPC to use. In our case, it would be the default VPC.
Please make sure you have done the following
Enter the subnet name
Select the availability zone. You can leave it as
No preferenceif you wish to stick to the default settings.Enter the IPv4 CIDR block for the subnet.
- Please make sure the CIDR range provided is within the primary CIDR block. E.g:
172.31.x.0/20, where you should replace x with a value that will not clash with the existing subnet CIDR range.
- Please make sure the CIDR range provided is within the primary CIDR block. E.g:
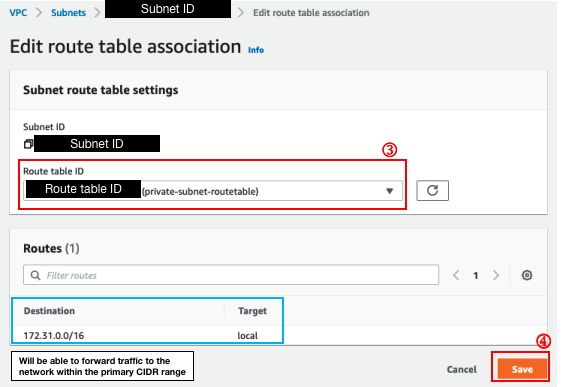
3. Associate the private subnet to the route table
For subnets created in the default VPC, the default route table will automatically be assigned to the newly created subnet. You will need to explicitly associate the route table created in step 1 to the newly-created subnet.
To associate the private subnet to the target route table
Click on the newly created subnet. Navigate to the 'Route table' tab at the bottom of the page
Click
Edit route table association
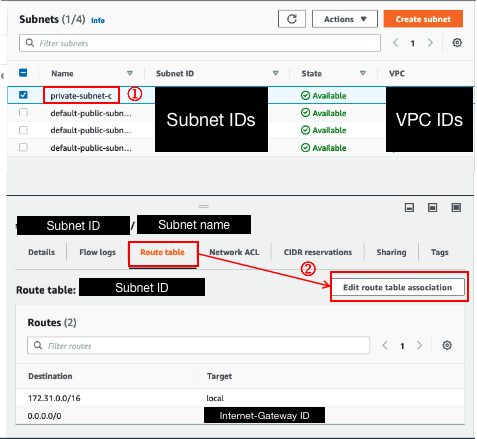
Select the newly created route table above
Click
Save
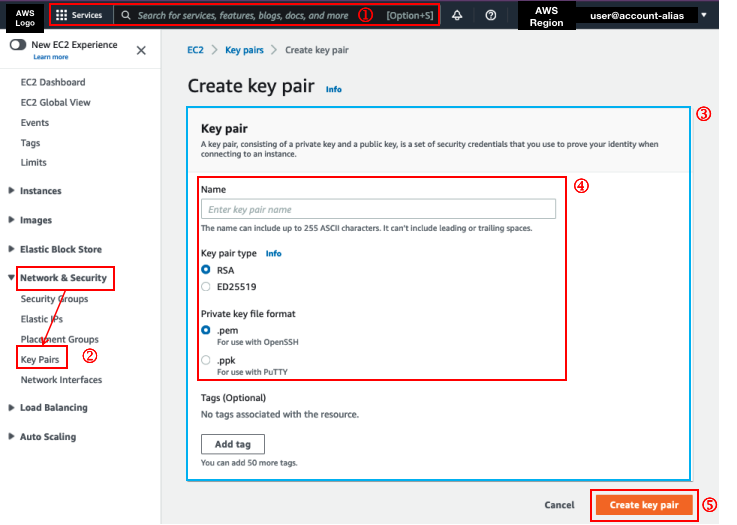
4. Create SSH Key Pair
You can skip this step if you already have an existing keypair. If not, follow the steps below to create one.
Search for
EC2to navigate to the EC2 Dashboard.Navigate to
Network & Security> ClickKey PairsClick
Create key paironce you are in the Key pairs page. You will be redirected to theCreate key pairinterface.Please make sure you have done the following
Enter the name of the keypair.
Select
RSAand.pemfor the key pair type and private key file format.
Click
Create key pairafter providing the necessary input.- A
.pemfile will be downloaded automatically to your local machine.
- A
Please keep this keypair safe! If you lost this keypair, you will have to delete and recreate a new one.
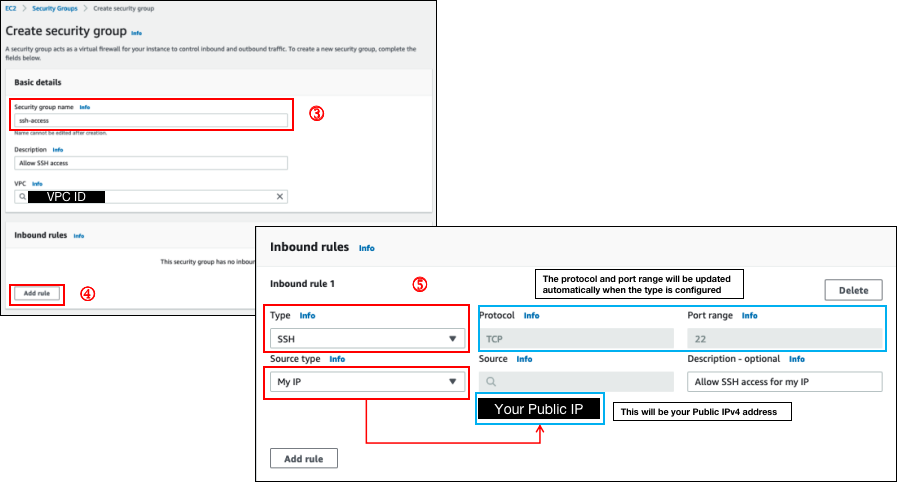
5. Create Security Group
We will need SSH access to access our EC2 instances.
Search for
Security Groups. Click on the one that indicate it to be 'EC2 feature'Click on the
Create security groupbutton.Please make sure you have done the following
Security group name
Description
VPC (Should already be the default VPC)
Click
Add ruleIn the 'Inbound rule 1', please make sure you have done the following
Set the
Typeto beSSHSet the
Source typeto beMy IP
Click
Save
Launch EC2 instance
Disclaimer on incurring cost
- If your account is under the 12-month AWS Free Tier program, please stick to the free tier EC2 instance type, i.e. t2.miro
- If your account no longer under the 12-month AWS Free Tier program, you will incur the regular charges for running EC2 instances
Phew, we have done quite a bit of configuration!
We can now spin up an EC2 instance in the public subnet and private subnet respectively. We will be using them to test the Bastion Host configurations to access our resources in the private subnet.
AWS Management Console provides an intuitive interface to launch EC2 instances in a step-by-step flow. Below are the specifications you should choose:
Choose AMI: Please select Amazon Linux 2 AMI (HVM)
Choose Instance Type: Please select t2.micro
Configure Instance: Please ensure you select the following
- For
Subnet, select the intended subnet (private/public) when you create for the respective subnet(private/public)
Add Storage: Use the default; Click Next
Add Tags: Please add a tag, with the key being "Name" and the value being the intended EC2 name
Configure Security Group:
- Please select the security group for SSH you have created earlier
- Review: Check that you have selected the right values.
Verifying EC2 Connectivity
Now that the EC2 instances are up, we can proceed with trying to connect to them.
For brevity, I will be referring to the EC2 instance in the private subnet as 'private EC2' and the EC2 instance in the public subnet as 'public EC2'.
Some values would be generic placeholders as they may be sensitive information or values that may vary for your own environment.
SSH into your instance
Select your EC2
Right-click on your EC2 > Connect
You can copy the command to SSH into your instance
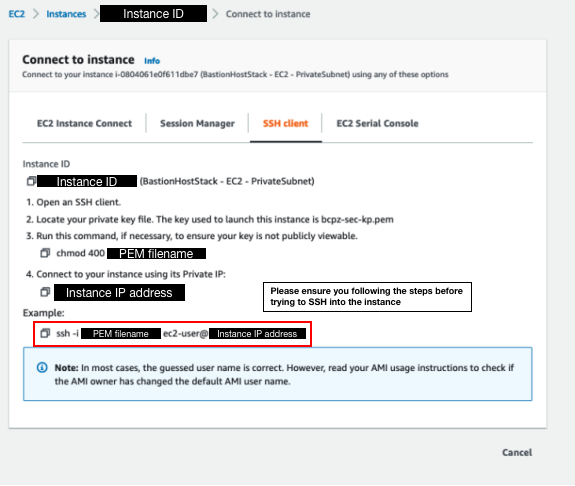
Connect to your EC2 instances
Activity 1
Try SSH into your private EC2.
Intended behavior
You shouldn't be able to connect to the EC2 as it resides in the private subnet. You will see the following error when attempting to SSH.
% ssh -i "<pem_filename>" ec2-user@<instance_ip_address>
ssh: connect to host <instance_ip_address> port 22: Operation timed out
Activity 2
Try SSH into your public EC2.
Intended behavior
You should be able to connect to the EC2 as it has a public address attached to it. You may be prompted to verify if you want to continue connecting, enter yes to SSH into the EC2 instance
% ssh -i "<pem_filename>" <public_dns_instance_address>
<Console output is removed for brevity>
[ec2-user@<instance_ip_address> ~]$
Troubleshooting
If you face an issue connecting, you will have to check if you have attached the right security group to the public EC2.
Accessing your EC2 in the private subnet via Bastion Host
Our EC2 in the public subnet will act as the Bastion Host to access our EC2 in the private subnet. Here's a recap of the architecture diagram for Bastion Host to access the private EC2
How do we connect without adding the private key into the private EC2 instance?
As mentioned above, we will be using SSH agent forwarding to access the private EC2 via the Bastion host without storing the private key in the Bastion Host
What is an SSH Forwarding Agent
For a Linux/Unix machine, the ssh-agent is a built-in program to keep track of your private keys. This program allows us to log in without having to store the private keys in the Bastion host.
You can use the ssh-add command to add the private key into the SSH authentication agent, thus implementing a single sign-on with SSH.
% ssh-add <pem_filename>
Identity added: <pem_filename> (pem_filename)
Verifying Bastion Host Setup
You can now try to SSH into the public EC2 with
ssh -AInside the public EC2, try to SSH into the private EC2 via its private IP address
% ssh -A  <public_dns_instance_address>
[ec2-user@<public_instance_ip> ~]$ ssh -A ec2-user@<private_instance_ip>
Conclusion
And voilà! You are now able to access your resources in the private subnet via a Bastion Host.
In this article, we cover some pointers about the default VPC and subnets in AWS. This is followed by configurations to set up the Bastion Host to be able to access our resources in the AWS private subnet. We also briefly covered SSH forwarding agents, which is useful in keeping track of our private keys.
My Food 4 Thought
Networking has always been quite daunting for me 😵💫 From this learning experience, I got to familiarize myself with the difference in connectivity between private and public subnet, as well as at the VPC level.
Do you feel the same in understanding the intricate details of computer networks? Do drop some comments to share your views 🙌🏼
A little onto Automation
Find the steps via AWS Management Console a little tedious and cleaning up is a hassle? You can find the article for the ready-to-use CloudFormation templates to provision for this setup through Infrastructure as Code (IaC)
![[DH] Keeping an organised inventory of annotated screenshots](/_next/image?url=https%3A%2F%2Fcdn.hashnode.com%2Fres%2Fhashnode%2Fimage%2Fupload%2Fv1731688657857%2Fcaeeeb6f-1530-4c88-a820-d22deaf0391e.png&w=3840&q=75)


