[CloudFormation] Create Lambda-backed custom resource
A fledgling engineer dabbling into areas of DevOps, AWS and automation. I enjoy tinkering with technology frameworks and tools to understand and gain visibility in the underlying mechanisms of the "magic" in them.
In the progress of accumulating nuggets of wisdom in the different software engineering disciplines!
The Why
Being able to customize and create custom resources that are not natively supported by CloudFormation is pretty cool.
For the longest time, I find this feature puzzling with the following questions:
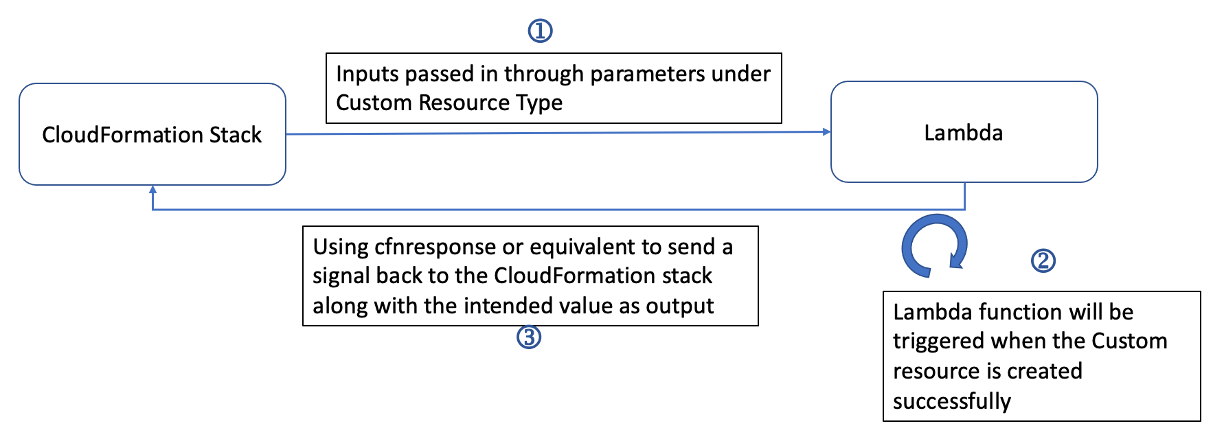
How does CloudFormation pass inputs to the Lambda function?
How is the Lambda function triggered from the CloudFormation stack?
How does Lambda function return the outputs to CloudFormation?

So here I am, taking the chance to break things down and understand the process of how CloudFormation uses custom resources.
Use Case: Generate a random string
For simplicity, I will be creating a utility function to generate a random string as a Custom Resource.
The input will be the length of the random string.
The output will be to get the random string of expected length.
The Lambda function name will be named
testfunction.
TLDR; Workflow
In general, this is what happened when you create a Lambda-backed custom resource for CloudFormation.
TLDR; Source Code
You can download the same CloudFormation template at https://github.com/bernicecpz/hashnode_resources/blob/main/aws_series/cf_templates/02_lambda_custom_resource/custom_resource.yml
You can skip the section below if you prefer to get your hands dirty and try the exercise yourself. After all, seeing is believing!
Otherwise, you can follow along to build the CloudFormation template together in the next section.
The template below contains some setup (i.e. uploading of packages to S3)
If you prefer the CloudFormation template to be ready out of the box, you can refer to this template - https://github.com/bernicecpz/hashnode_resources/blob/main/aws_series/cf_templates/02_lambda_custom_resource/custom_resource_ofb.yml
The CloudFormation template can be used without any additional setup.
Before getting started below, create a folder to contain all your source code.
Walkthrough Exercise
Prerequisites
Python modules
The Lambda layers will contain the additional modules that need to be installed beforehand.
The requirements.txt can be referenced at <INSERT_URL>
# Create a python virtual environment, in this example, we will call it layers
python3 -m venv layers

# Enable the virtual environment
. layers/bin/activiate

# Install the required libraries
pip3 install -r requirements.txt
After running the commands above, create a .zip file archive from the virtual environment folder. In this case, it will be called layers.zip
Create an S3 Bucket
We will need to upload the zip package (containing additional Python Modules) into an S3 bucket for the CloudFormation template to pull from for the Lambda Layers.
For this step, do refer to the AWS Documentation below for guidance
https://docs.aws.amazon.com/AmazonS3/latest/userguide/create-bucket-overview.html
CloudFormation Template Walkthrough
Parameters & CloudFormation Interface
While this is optional, I feel this is useful in grouping the parameters together to convey their use in the CloudFormation. You can choose to exclude this in your CloudFormation template.
AWSTemplateFormatVersion: '2010-09-09'
Description: "This templates is to create a Lambda-backed Custom Resource"

Metadata:
  AWS::CloudFormation::Interface:
    ParameterGroups:
      - Label:
          default: 'Inputs for Lambda Layer'
        Parameters:
          - S3BucketName
          - LayerPackage
      - Label:
          default: 'Inputs for Lambda Function'
        Parameters:
          - FunctionName
          - MethodName
          - ModuleName
      - Label:
          default: 'Inputs for Custom Resource'
        Parameters:
          - Length

Parameters:
  S3BucketName:
    Description: 'S3 Bucket hosting the packages for Lambda Layer'
    Type: String
  LayerPackage:
    Description: 'Name of package zip file containing the modules for Lambda'
    Type: String
    Default: 'layers.zip'
  FunctionName:
    Type: String
    Default: 'testfunction'
  MethodName:
    Description: 'Method name that will be executed by Lambda'
    Type: String
    Default: 'lambda_handler'
  ModuleName:
    Description: 'Using ZipFile will generate index.py file'
    Type: String
    Default: 'index'
  Length:
    Description: 'Input parameter for Custom Resource'
    Type: Number
    Default: 10
Resources Section
Lambda Execution Role
Resources:
  LambdaExecutionRole:
    Type: AWS::IAM::Role
    Properties:
      AssumeRolePolicyDocument:
        Version: '2012-10-17'
        Statement:
        - Effect: Allow
          Principal:
            Service:
            - lambda.amazonaws.com
          Action:
          - sts:AssumeRole
      Path: "/"
      Policies:
      - PolicyName: CustomResourceLambdaExecutionPolicy
        PolicyDocument:
          Version: '2012-10-17'
          Statement:
          - Effect: Allow
            Action:
            - logs:CreateLogGroup
            - logs:CreateLogStream
            - logs:PutLogEvents
            Resource: arn:aws:logs:*:*:*
          - Effect: Allow
            Action:
            - ec2:DescribeImages
            Resource: "*"
Lambda Layers
  LambdaLayer:
    Type: AWS::Lambda::LayerVersion
    Properties:
      LayerName: customResourcePkgs
      Description: Dependencies for the utility function
      Content:
        S3Bucket: !Ref S3BucketName
        S3Key: !Ref LayerPackage
      CompatibleRuntimes:
        - python3.9
Lambda Function
I will be using Python 3.9 runtime for the custom resource.
For ease of modifying the source code, I will be writing the code inline in the CloudFormation template under ZipFile.
AWS CloudFormation places the function source in a file named
indexand zips it to create a deployment package.This zip file cannot exceed 4MB. For the
Handlerproperty, the first part of the handler identifier must beindex. For example,index.handler.
  LambdaTestFunction:
    Type: AWS::Lambda::Function
    Properties:
      Description: 'Test Function to visualize Input Output'
      Runtime: python3.9
      FunctionName: !Ref FunctionName
      Role: !GetAtt LambdaExecutionRole.Arn
      # Have to name it Python_File_Name.Method_Name
      Handler: !Sub '${ModuleName}.${MethodName}'
      Layers:
        - !Ref LambdaLayer
      Code:
        ZipFile: |
          import json
          import random, string
          import cfnresponse

          def generate_random_string(length):
              characters = string.ascii_letters + string.digits + string.punctuation
              random_string = ''.join(random.choice(characters) for index in range(length))
              return random_string

          def lambda_handler(event, context):
              try:

                # To see the responseData
                ## Note this will be printed in CloudWatch Logs
                responseData = {
                    'statusCode': 200,
                    'body': json.dumps(event)
                }

                string_length = int(event["ResourceProperties"]["Length"])
                final_output = str(generate_random_string(string_length))


                cfnresponse.send(event, context, cfnresponse.SUCCESS, responseData, final_output)
              except Exception as err:
                print(f'{err}')
                cfnresponse.send(event, context, cfnresponse.FAILED, responseData)
Custom Resource
I will be naming my custom resource as GetRandomString. As mentioned above the expected input will be a number, i.e. the length of the string.
  GetRandomString:
    Type: Custom::LambdaTestFunction
    Properties:
      ServiceToken: !GetAtt LambdaTestFunction.Arn
      Region: !Ref "AWS::Region"
      Length: !Ref Length
Outputs Section
The custom resource will return a random string with the intended length.
Outputs:
  GetRandomString:
    Value: !Ref GetRandomString
Creating Custom Resource Stack
In your AWS Management Console, navigate to CloudFormation Dashboard
Click on "Create Stack"
Depending on your dashboard, you can see the "Create stack" button
Alternatively, you can navigate to "Stacks" to create the stack via the dropdown

Under "Specify template", select "Upload a template file"
Select the "custom_resource.yml" file and click "Next"

Fill up the following fields
Stack name
S3BucketName: Put the name of the S3 Bucket you created above

Click "Next" until you reach the "Configure stack options"
Under stack creation options, set the timeout to be 5 minutes
The default will be 1 hr
This is so that in the event the custom resource failed, you don't have to wait for 1 hr to delete the stack away

Click "Next" to review the stack configurations
After selecting the acknowledgement checkbox, click "Submit"
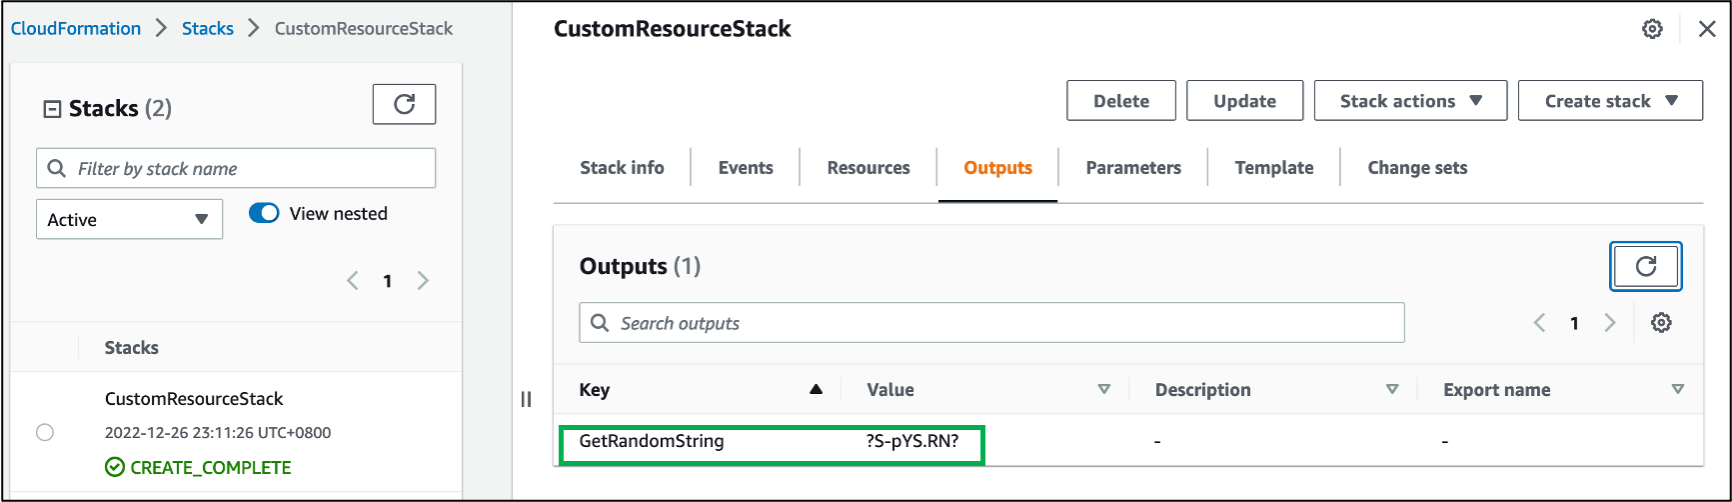
End Goal
You should be able to see a random string generated under the GetRandomString Key under the "Outputs" section.
Caveats
CloudFormation relies on a changeset to trigger an update in the stack. Thus, a change in the template that affects the Resources is required.
- CloudFormation's underlying mechanism to check for changeset involves comparing previous CloudFormation templates in S3.
You can do so by modifying the value of the parameter "Length" to be able to trigger an update to rerun the custom resource.
Closing Thoughts
Guess analysis paralysis got the better of me. When I was relatively new to AWS services, I find AWS documentation to be daunting.
Despite them having great examples (to get AMI ID), I couldn't shake off the feeling that I don't fully understand the "why" from the examples and "so what's next?" for practical application.
I am glad I manage to grasp the concept of Lambda-backed custom resources on my terms. Hope you find this article encouraging to get started in trying it out as well! Cheers 🍻
Resources
Here are the resources I referred to:
![[DH] Keeping an organised inventory of annotated screenshots](/_next/image?url=https%3A%2F%2Fcdn.hashnode.com%2Fres%2Fhashnode%2Fimage%2Fupload%2Fv1731688657857%2Fcaeeeb6f-1530-4c88-a820-d22deaf0391e.png&w=3840&q=75)


