Rocket.Chat Integration with Gitlab
A fledgling engineer dabbling into areas of DevOps, AWS and automation. I enjoy tinkering with technology frameworks and tools to understand and gain visibility in the underlying mechanisms of the "magic" in them.
In the progress of accumulating nuggets of wisdom in the different software engineering disciplines!
Overview
Lazy to constantly check for the latest update in the team's project repository? Webhooks can be used to push notifications into your chat tool from your CI/CD platform.
Prerequisites
Tech Stack
I used the [official Rocket.Chat docker image](https://hub.docker.com/_/rocket-chat) as my testing environment. You can refer to the steps here in the its Docker page.
I will be using Gitlab for the CI/CD platform.
Additional steps for Rocket.Chat
Create personal access token
The personal access token will be used when calling Rocket.Chat REST API endpoints.
A
User-IdandTokenwill be provided upon creation.

Create a new role for specific permissions
When setting up, the user you will be using would be with Admin role.
The minimum [permissions](https://docs.rocket.chat/use-rocket.chat/rocket.chat-workspace-administration/permissions) required are:
botroleManage Own Incoming IntegrationsandManage Own Outgoing Integrations
As users are granted permissions via roles, it would be recommended to create a new role for granular control of permissions.
In this case, I created a role named integrations-role with permissions Manage Own Incoming Integrations and Manage Own Outgoing Integrations tied to it.
Configure Integrations
1) Create incoming integration in Rocket.Chat
The incoming integration in Rocket.Chat will generate the webhook URL that will be used in Gitlab to trigger notifications to the target channel.
Enabling script in incoming integrations
It's quite interesting and puzzling that the script option is disabled by default. This is because if no script is enabled, the incoming integration will return empty messages when the webhook is triggered.
I have customized the [sample incoming webhook script](https://docs.rocket.chat/use-rocket.chat/rocket.chat-workspace-administration/integrations#script-details) on the content to be sent to the webhook when triggered by Gitlab events.
class Script {

    process_incoming_request({ request }) {

      content = request.content

      dataToPrint = {
        "event_name": content.event_name,
        "branch": content.ref,
        "project_repo": content.repository.name,
        "changes": content.commits
      }

      return {
        content:{
          text: JSON.stringify(dataToPrint, undefined, 4)
         }
      };

    }
}
In the REST API call, I have minified the script into 1 line for the Create Integration curl command below.
- Replace the placeholders (in angle brackets <>) with appropriate values
curl --location --request POST 'http://localhost/api/v1/integrations.create' \
--header 'X-Auth-Token: <REPLACE_WITH_X_AUTH_TOKEN>' \
--header 'X-User-Id: <REPLACE_WITH_USER_ID>' \
--header 'Content-type: application/json' \
--data-raw '{
    "name": "incoming-restapi-integration",
    "type": "webhook-incoming",
    "username": "<USERNAME>",
    "alias": "Incoming-from-Gitlab",
    "channel": "#<CHANNEL_NAME>",
    "scriptEnabled": true,
    "enabled": true,
    "script": "class Script{process_incoming_request({request}){content=request.content;dataToPrint={event_name:content.event_name,branch:content.ref,project_repo:content.repository.name,changes:content.commits};return{content:{text:JSON.stringify(dataToPrint,undefined,4)}}}}"
}'
If you want to update the incoming integrations subsequently, you can use the following Update Integration curl command
- Note the difference is the inclusion of the required key
integrationId
curl --location --request PUT 'http://localhost/api/v1/integrations.update' \
--header 'X-Auth-Token: <REPLACE_WITH_X_AUTH_TOKEN>' \
--header 'X-User-Id: <REPLACE_WITH_USER_ID>' \
--header 'Content-type: application/json' \
--data-raw '{
    "name": "incoming-restapi-integration",
    "type": "webhook-incoming",
    "username": "<USERNAME>",
    "alias": "Incoming-from-Gitlab",
    "channel": "#<CHANNEL_NAME>",
    "scriptEnabled": true,
    "enabled": true,
    "script": "class Script{process_incoming_request({request}){content=request.content;dataToPrint={event_name:content.event_name,branch:content.ref,project_repo:content.repository.name,changes:content.commits};return{content:{text:JSON.stringify(dataToPrint,undefined,4)}}}}",
    "integrationId": "<INTEGRATION_ID>"
}'
Caveats
There seems to be a known bug where the token and webhook URL created via GUI console will result in
Service Unavailableerror, even on the latest version i.e. v5.4.0 at the time of writing.Hence, the incoming integration must be managed using the [Integrations endpoints](https://developer.rocket.chat/reference/api/rest-api/endpoints/core-endpoints/integration-endpoints).
This means creating and updating the endpoints should be done via the REST API
If you try to make changes via the GUI, the integrations will not be updated regardless.
2) Configure webhook in Gitlab
Next, configure the type of events that will trigger a notification to Rocket.Chat.
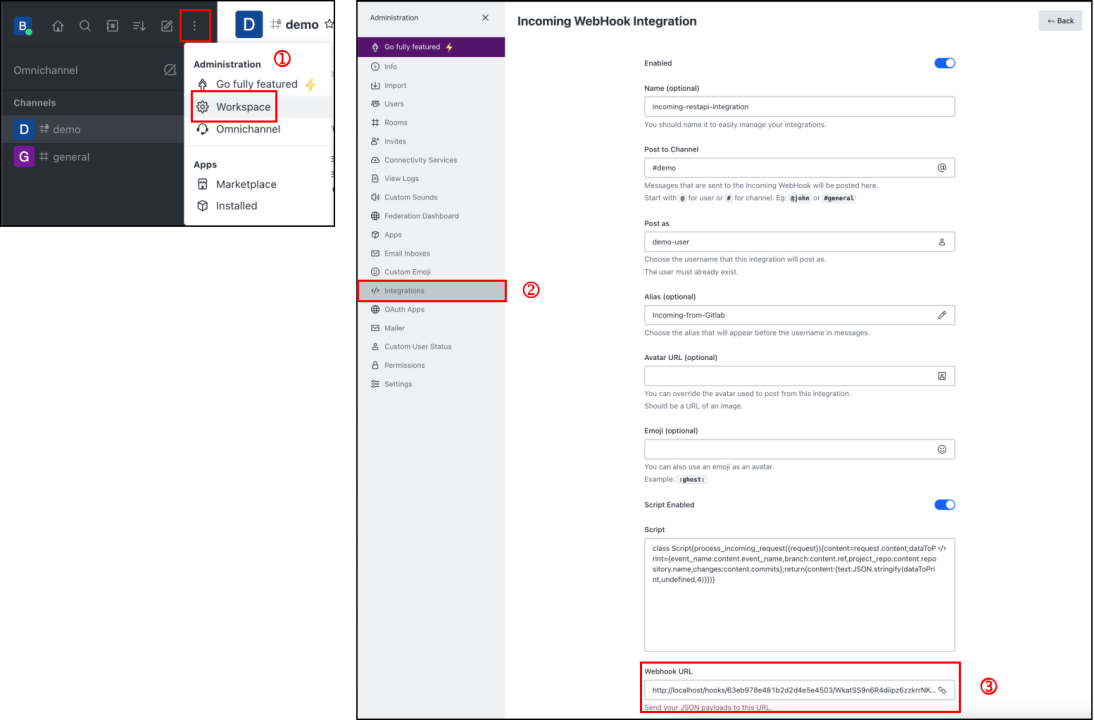
You can retrieve the webhook URL via the Administration Workspace dashboard.
From the menu button, click on Workspace
Click on Integrations to reveal the existing integrations. Select the one you created
You should be able to find the webhook URL for your selected integration
To make the local environment accessible, I used ngrok http 80
Use ngrok for testing purpose only!
It can potentially expose your devices to threat actors if you leave the connection persistently online. Read this article from Huntress to better understand the security context
For simplicity, I will be selecting push events for all branches.
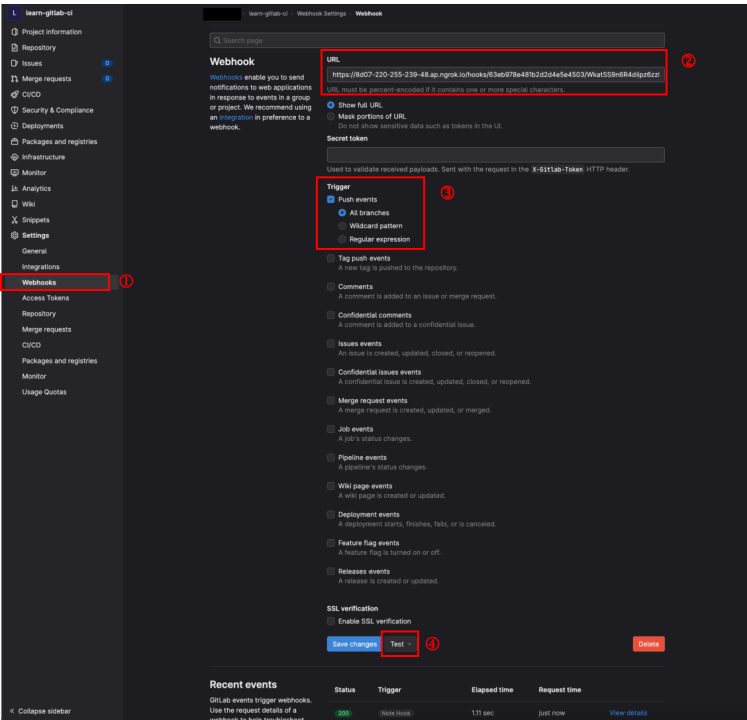
Steps
Navigate to Settings > Webhooks
Provide the webhook URL generated in Rocket.Chat incoming integration
Select the Triggers that will invoke the webhook
Use Gitlab
Testfeature to verify the connectivity
Verification
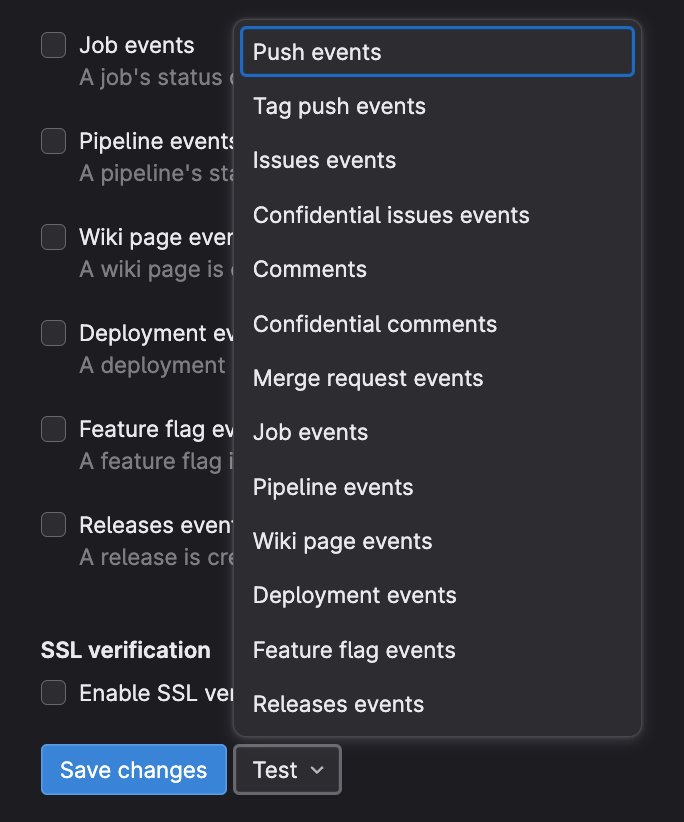
Upon clicking on the Test dropdown, you can select the event type to test. In our case, we will be clicking on the Push events.
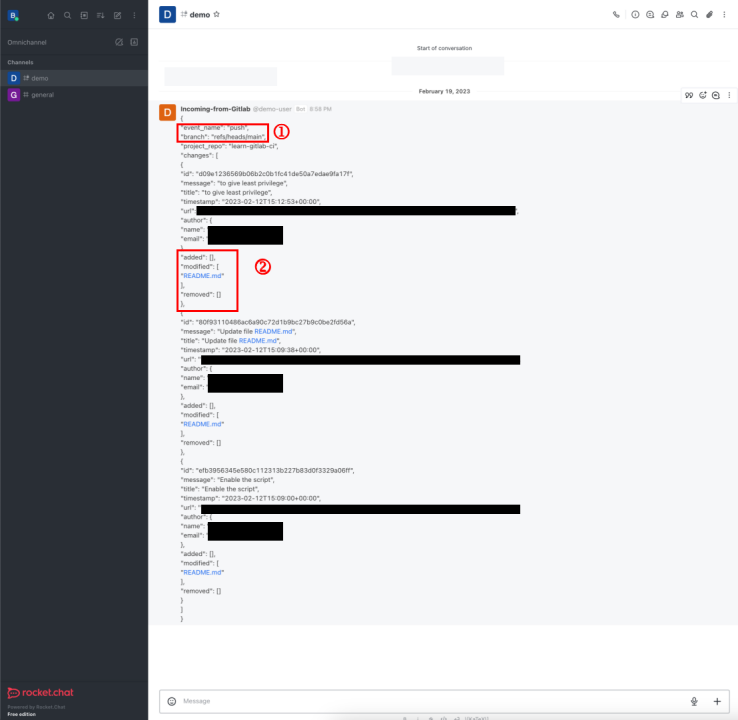
Upon triggering the push event, a notification is triggered to send the push event information into the specified channel.
In this screenshot, the notification from Gitlab provides us with the following details
The type of event i.e. push events
The file(s) that have been added, modified and deleted
You can see that there are 3 commits for this push event.
Final Thoughts
My initial motivations spark when I didn't stay up-to-date with the latest changes in the team's centralized repository🤦🏻♀️ As notifications are done manually through message broadcast, there is inevitably the human error of forgetting to push such manual notifications 😣
Hopefully, this will allow me to be more diligent in following the latest changes in the selected project repositories 🌚
Cheers!
![[DH] Keeping an organised inventory of annotated screenshots](/_next/image?url=https%3A%2F%2Fcdn.hashnode.com%2Fres%2Fhashnode%2Fimage%2Fupload%2Fv1731688657857%2Fcaeeeb6f-1530-4c88-a820-d22deaf0391e.png&w=3840&q=75)


